 handbasket")
|
Helena Observatory, Tupperville, NS |
|
|
| ||
HEQ5 Polar Alignment | ||
| 27-Jun-2026 21:16 ADT | 28-Jun-2026 00:16 UTC | |
|
| ||
|
|
Helena Observatory, Tupperville, NS |
|
|
| ||
HEQ5 Polar Alignment | ||
| 27-Jun-2026 21:16 ADT | 28-Jun-2026 00:16 UTC | |
|
| ||
We have moved. Observations resumed at the new location in Tupperville in mid-June. Some data discrepancies may occur as files are updated to reflect the new location.
IntroductionThe task of orienting the polar scope is greatly hindered by the fact that the HEQ5 manual is full of mistakes. If you already know how to do a polar alignment, you probably don't need the manual and won't notice the mistakes. On the other hand, if this is your first precision mount, you probably will need the manual, and it will certainly confuse you. You simply cannot do the alignment if you follow the manual. In fact, following the manual is literally impossible - among other problems, it requires the setting circle to be in two different places at once. So, ignore anything in the manual that relates to polar alignment. This procedure is biased towards observers in the Northern Hemisphere. Sorry, southies! It took me three days to work out this procedure. I haven't yet had the time to work out the southern hemisphere equivalent. 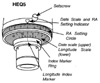
In these procedures, I use the same component names that the HEQ5 manual describes in Figure h-1 on page 11.
(Click on thumbnails The nightly polar alignment is what you do at the beginning of each observing session. It is best performed with the telescope and counterweights removed from the mount. Here are two procedures for doing the polar scope alignment. The two procedures are:
Of the two, the first method is much faster and simpler. Nightly alignment with SynScan

Nightly Alignment with Stellarium or other similar software
Nightly Alignment with Hour AngleFor this procedure, you do not need to orient the Polar Scope Reticule, as described below, since you will not be using the Date Scale Index Marker. However, you should still have performed the Aligning the Polar Scope Reticule procedure. It only needs to be done once, unless you have removed the polar alignment scope from the mount.
Nightly Alignment without Hour AngleUse this procedure if you do not know the current hour angle for Polaris. It uses the Date and RA Scales to determine the appropriate orientation of the mount, in effect computing Polaris' hour angle.
Home Position."Home Position" is the position in which the OTA is on the top side of the RA axis, pointing at the north pole. After completing your polar alignment, and before starting your star alignment, you need to restore the scope to the Home position. The easiest way to do this is to disengage the clutches on the two axes and manually spin the scope back to the home position. Try to be as accurate as you can. The accuracy of the controller's map of the sky depends on having an accurate home position, because the home position is its reference for the portion of the sky outside of the 3-star alignment triangle. You can "eyeball" the home position. However, for more accuracy:
The mount is now exactly in the Home position. When you balance your scope on the mount, you will move it away from the home position. However, you can restore it to the exact home position you justt measured by using the setting circles. You will need to do so before starting your star alignment. Remember, any time you disengage one of the clutches, the controller has no knowledge of what you are doing and assumes that the axis has not moved. It loses its reference for that axis. You will need to give it back its reference by performing another star alignment. When should I mount the scope?Mounting the scope is problematic because you have to balance it. Balancing requires that you unlock both the RA and Dec axes, potentially losing the accurate home position alignment you have just carefully set up. If you are able to do the leveling steps described above with the scope mounted, then you can mount and balance the scope before setting up the home position. This depends on having a long enough counterweight shaft or a short enough bubble level that you can apply the level to the shaft with the counterweights in place. It also requires that you use an alternate method of leveling the Dec axis, such as by applying the level to the OTA.Alternatively, you can mount the scope after completing the home position setup. To do this, do not disturb the setting circles after you have set up the home position. Mount and balance the scope, releasing the clutches as required. Once the scope is mounted, use the setting circles to restore the mount to the home position. Since the home position was established using the setting circles to begin with, you have not lost any accuracy in doing this. You are now ready to perform your 3-star alignment and begin observing. Clear skies!
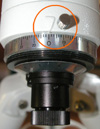
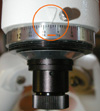
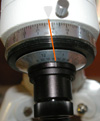
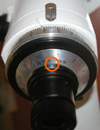
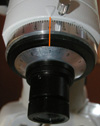
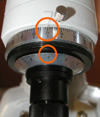
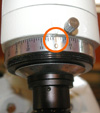
The following procedures are not part of the nightly setup. One-Time SetupPart 1 - Orienting the Polar Scope ReticuleThe objective of this procedure is to properly set up the Longitude Index Marker so that it can be used in the Nightly Alignment without Hour Angle procedure above. This procedure only needs to be done once. You need to calculate a "Longitude Offset" for your specific observing location, to adjust for your location within your time zone. (The manual refers to this by the confusing term "calculated zero position".) By convention, West is negative and East is positive. Multiply your time zone (in hours from GMT) by 15. This is the central meridian of your time zone. For example, Eastern Time Zone is GMT-5, so the central meridian of the Eastern Time Zone is: 15 * (-5) = -75 (75 degrees W). Calculate the difference between your actual longitude, to the nearest degree, and this number. London Ontario is 80 degrees W (-80), so: (-80) - (-75) = -5. London Ontario is therefore 5 degrees west of its central meridian. This number (5 degrees W in this example) is your Longitude Offset, used in step 3 of the Without Hour Angle procedure. Then continue...
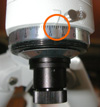
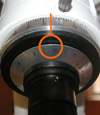
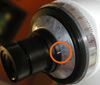
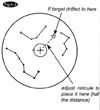
Note on Part 1.1 The date and time (10th of October at 01:30 – [Not 01:00 as stated in the manual] ) used in the procedure are for a known transit of Polaris and for the geographic centre of any time zone. You can substitute the date and time any other known transit of Polaris, but you must then adjust for the location (within the time zone) for which the transit was calculated, and use the correct Longitude Offset in step 6, above. The geographic correction from the centre of your time zone to your actual observing location is made in step 3 of the Without Hour Angle procedure, where, instead of rotating the Index Marker Ring to align with 0 on the longitude scale, you align it with your Longitude Offset, the number of degrees that the location lies east or west of its time zone geographic centre, using the Longitude Scale. Part 2: Aligning the Polar Scope ReticuleThe polar scope needs to be aligned with the polar axis of your mount. The steps below tell you how to perform this alignment. Note, you can do this procedure at night while pointing at Polaris. However, it is probably easier to do it in the daytime using a distant point as your target (e.g, a street light a couple of hundred yards away). If doing the procedure during the day, you might find it convenient to set your altitude (latitude) to near parallel with the ground to put the eyepiece of the polar scope into a comfortable position. Just be sure to leave room to make vertical adjustments in both directions. Also, do this procedure without an OTA or counterweights. It will make turning the mount a lot simpler.
You can now proceed to the Nightly Alignment without Hour Angle procedure. |
Copyright © 2019 by Kathleen Walker
Last modified: 02-Feb-2019