 handbasket")
|
Helena Observatory, Tupperville, NS |

|
|
| ||
Helena Observatory Blog: 2015 | ||
| 10-Jul-2026 17:33 ADT | 10-Jul-2026 20:33 UTC | |
|
| ||
|
|
Helena Observatory, Tupperville, NS |
|
|
| ||
Helena Observatory Blog: 2015 | ||
| 10-Jul-2026 17:33 ADT | 10-Jul-2026 20:33 UTC | |
|
| ||
| 14-Dec-2015 |
With the observatory operational for visual observing, it is time to get back to working on my dome controller. When I disassembled the observatory prior to moving, in the spring, I had just completed assembly of the main control unit. Today, I tested it for the first time. The simplest test was of the emergency close circuit, so I did that first. When I pressed the button, I was expecting a light to come on, and several realays to click on. I got the light, but the relays were buzzing instead of giving a single click. Not good. After a couple of seconds, a diode that apparently was filled with too much smoke released the excess. Oops. When components are smoking and insulation is melting, it is not a good idea to try to debug a circuit with a voltmeter! So, I turned to the circuit diagram and traced all the connections to the overheated components. The only thing I can think of is that I may have connected the quench diodes for the motors backwards. (There were no motors connected during the test, but the diodes are right in the controller box.) The resulting short circuit when the relays close would drop the voltage, opening the relays again, producing the buzz I heard. I will probably have to replace some diodes before I can resume testing of the controller. |
| 13-Dec-2015 |
Last night and tonight, I had my first view through a telescope at Hall's Harbour Observatory. Last night was a preliminary polar alignment, during which I discovered just how badly out of alignment my polar scope reticle was. I guesstimated the alignment as close as I could and had a quick look at M31, just because it was directly overhead and it seemed a crime not to. I was using the C-11 with a 0.63 focal reducer and a 42mm eyepiece (i.e. minimum magnification for the C-11), and I could just barely get M32 and M110 in the same field of view. Between the 11" aperture and the dark, transparent sky, I had no trouble making out the dust lanes in M31. This afternoon, I tried to get the polar scope aligned. Since the mount can't see over the dome sill when the latitude is brought down to 0 degrees, I was limited to treetops as alignment targets. It was windy. So, scratch that idea. I tried again tonight, using Polaris. I'd forgotten what a royal pain in the butt aligning a polar scope is! I got it pretty close after about an hour fiddling with it. Got the polar alignment re-done, did a quick one-star goto alignment, and set about looking at stuff. M31, again, of course. I tried M33, but it was on the other side of the meridian, and the one-star alignment didn't account for cone error, so it wasn't in the FOV. Rather than mess around scanning for it, I went on to M42, which was just clearing the trees. This was my first time seeing it since the August star party, and the first time ever in the C-11. It is really sweet in the 42mm and 27mm eyepieces. I tried zooming in on the Trapezium with the 6mm eyepiece, which, with the 0.63 reducer, should have been workable. It kind of worked, but the focus was soft. The Trap sure did fill the FOV, though! I had a look at M1, which I haven't seen in a while. With the 6mm, it was too dim and fuzzy to make out clearly. With a 10mm Kellner, its shape was quite recognizable. By then, it was getting cool, so I shut down for the night. My main objective, polar alignment, had been met, and I had a satisfying first light. On the way back to the house, I turned off the flashlight and did some naked eye viewing. I was finally able to make out M33 naked eye, right at the zenith. It is definitely a target averted vision only, but there was no doubt that there was something dim and fuzzy in the right spot. This is a Bortle 3 (blue) site, and the night had above average transparency. I also saw one Geminid meteor as I was coming in.
|
| 12-Dec-2015 |
A major step today. After hooking up the shutter controller and debugging a loose connection in the limit switch wiring, I was able to open the shutters. It being a clear evening, I was able to do an initial polar alignment! Considering all the steps required to get the mount installed in the correct orientation (survey site with magnetic compass; tie flagging tape on north and south sightlines; align bolts in wet concrete using wooden 'gunsight' sighting on flagging tape; coarse-adjust the mount using latitude scale and eyeball north), I was quite amazed to peer through the polar scope and see Polaris close to the centre! Unfortunately, my polar scope was not collimated with the RA axis, and the instructions are for a different model of polar scope, so I had to estimate the alignment error and correct for it when I did the alignment. It's close enough for visual work, but I still have some work to do there. I am nowhere near ready for imaging yet. There are still uninstalled cables all over the place, and my dome rotation controller is still untested. But it is useable visually. And the sky here is nice and dark: I could easily see the dust lanes in M31 through the C-11. |
| 29-Nov-2015 |
Last weekend, I connected the network cable. It took a couple of tries to get the connectors right, but I now have the observatory laptop on the network. At Baie Ste. Marie Observatory, I used wifi to connect the observatory. Having a wired network is a huge improvement! Today, I cleaned up the last of the construction debris from the observatory and started moving in furniture and equipment. There is still a lot of work to do, but it looks more like an observatory now, with the mount installed on the pier. |
| 12-Nov-2015 |
In preparation for pulling the network cable, I have pulled a rope through each of the two runs of conduit: one from the house to the weather station and one from the weather station to the observatory. The first run will have two Cat 5 cables: one for ethernet and one as a spare. The second run will have the same two Cat 5 cables, but it will also include three additional Cat 5 cables for the weather station: two for data and one as a spare. I have measured out the midpoint of a 500-foot box of Cat 5 cable. I will pull the midpoint into the conduit, giving me two cables with a single pull. The two lengths will be separated once the pull is completed. For the weather station cables, I will recycle cable salvaged from the old Baie Ste. Marie Observatory. |
| 04-Nov-2015 |
Woo-hoo!! I have power!!! It's been a slog, but I pulled the final length of wire yesterday and completed the connections at both ends today. It passed the all-important smoke test, and I now have light and power in the observatory. There is also red light and power available out in the field, in case anyone comes to visit and needs a place to plug in their gear. I tested the Wifi connectivity to the house, and there basically isn't any. With a Wifi repeater at the weather station, I can get an intermittent signal. I intend to try the repeater at a location closer to the house, just as a backup, but it is looking like my next priority needs to be pulling the network cable. |
| 26-Oct-2015 |
Today, I pulled the first wire. This was the first leg of the AC power cable, 120 feet from the house to the weather station. First, I had to complete the section of conduit inside the house from the wall entrance to the power panel. I finished that yesterday. Today, I had only a two and a half hour window to complete the pull and get the conduit weather-tight again. I positioned my home-made cable spool about four feet from the opening of the conduit. The ends of all four wires were tied to the free end of the rope already positioned in the conduit. (I am using individual #10ga wires rather than sheathed cable.) After lubricating several feet of cable, I walked around to the other end of the run and started pulling. The cable lube is quite effective, and the amount of wire I could pull at a time corresponded almost exactly to how much I had lubed. As soon as unlubricated cable passed ofer the lip of the conduit, the resistance increased, and I would have to walk back to the other end to prepare the next length. Because there is a fence across the cable trench, it was not possible for me to walk the 120 foot run in a straight line. Each round trip from one end to the other was 540 feet. With an average pull length of four feet, I ended up walking about 3 miles! However, the good news is that, after a couple of hours of this, the wire emerged from the pipe at the weather station. I finished the day's work by measuring the distance from the open conduit to the electric panel, cut the cable off the spool to that length, and fed that end in through the wall entrance to the panel, where it is now ready for connection to the breaker. I am using 4 wires to give me a 240-volt circuit. I don't actually need 240 volts; I will be using it as two 120-volt circuits. Running it as a 240-volt circuit saves me wires (4 instead of 6), and it allows me to keep utility loads like motors and lights isolated from electronic loads. It is a 15-amp circuit, which would normally call for 14-gauge wire. However, at 100 feet, they recommend going to 12-gauge. Since my run will be about 170 feet when complete, I decided to go with 10-gauge. |
| 21-Oct-2015 |
I have spent the last three weeks doing mostly non-observatory stuff. I have Larkin's running pen cleared and the fence posts up. I will be putting up the fence wire tomorrow. I have also started stacking some of our firewood in the barn for long-term storage. (It is next winter's wood.) However, in between times, I have been getting ready for pulling cables, the next major step in getting the observatory operational. I built a spool to unreel the AC power wires smoothly, without tangling or twisting. Today, I started feeding rope through the conduit, in preparation for pulling wire. I have the first leg roped: the AC conduit from the house to the weather station. Since you can't push a rope, how do you get a rope into the conduit? This run is about 120 feet, too long for my metal fish tape. I tied a small scrap of aluminum foil to the end of a thin string ("mason's line"). I then placed the business end of my shop vac hose in the other end of the conduit and turned it on. Back at the first end, I dropped the aluminum foil "drag device" into the open conduit and fed out the string behind it. The shop vac pulled the foil and string through the conduit. Once it was fed through, I tied one end of the string to the end of a larger rope, and then pulled that through the pipe. I had to stop every few feet to lubricate the rope that was about to go into the conduit, using electrical cable lube. That operation involved a lot of walking, since I had to lube at one end and pull from the other end. I now have the rope in the first section of pipe. The next operation will be to use the rope to pull the cables into this section. I will then repeat the whole procedure for the second leg, from the weather station to the observatory. Eventually, I will need to repeat it twice more, for the two legs of the data cable. |
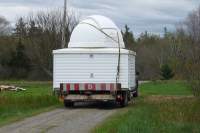
| 09-Oct-2015 |
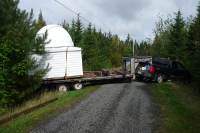
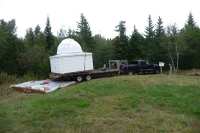
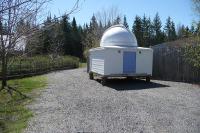
Last Saturday was the big day: the observatory building was moved to its final destination in the clearing. The move took 6 hours: 2 hours to load it onto the trailer, 2 hours to get it through the narrow passage (less than 100 feet long) through the trees, and 2 hours to unload it. No trees had to be cut down, thoug a few limbs had to be removed. They only dropped the building once; fortunately with no damage! The men from Linden Mac showed up shortly after 10:00 on Saturday. Using hydraulic jacks, they raised the building up onto beams and cribbing. Then, using just a manual come-along, they winched it onto the flatbed trailer. After the short, 100-foot trip down the driveway, they set about backing it through the trees to the prepared site. With limited space, the turn into the trees was tricky, using all the width of the driveway and then some, and requiring blocking in the ditch to keep the trailer level. The access path through the trees was zig-zaggy and barely wide enough for the trailer. Remember that backing a trailer requires extra room for the truck to manoeuver! By sliding the building from side to side on the trailer, they squeezed it by trees with just inches to spare. Unloading onto the foundation pad was accomplished using more blocking and a very large pry-bar. At one point, a hydraulic jack toppled, dropping the building. Fortunately, the beams and cribbing took all the impact force, leaving the building undamaged. More importantly, nothing hit the concrete pier footing. Finally, the building was in place, centred over the pier footing. I have been doing some landscape remediation in the days since. Because the approach to the building is a big mud-hole, I re-built the entrance deck (new framing, old boards) and graded a gravel path leading to it. I have also been removing the piles of excess soil from the trench excavation (displaced by the sand required around the electric conduit), so that the area can be turned into a running pen for Larkin. I am hoping that I can get the electricity hooked up before the weather gets too cold to work. With power, I can run a heater and condinue to get the equipment set up as winter sets in. |
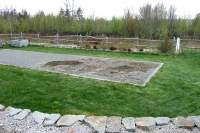
| 13-Sep-2015 |

I had a busy few days. I wheelbarrowed about 5 cubic yards of gravel from the driveway dump site to the observatory foundation. The gravel contains a lot of crusher dust, so it compacts well and sets up like concrete in the rain. I took advantage of one heavy rainstorm to compact and set the first layer. Today, I completed filling the foundation form, levelled it, and compacted it by boot. I also did some landscaping work to reclaim the ground surrounding the foundation. I still need to level the ground between the driveway and the site in preparation for the building movers. Tomorrow, I phone them to book the moving day. At last!! |
| 09-Sep-2015 |
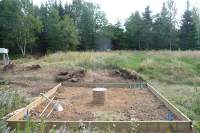
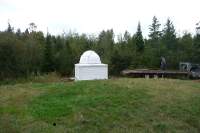
The concrete for the pier is all finished. The hole is back-filled, and the ground inside the foundation form is levelled. The next step will be filling the foundation form with gravel. Then, after some site cleanup so that there is a suitable access route, the building can be moved. The treeline is 10 to 20 degrees above the horizon. I have a lower skyline in small pockets east and south, and in a wider area to the south-west. It is not quite as good a skyline as I had at Baie Ste. Marie Observatory, but is a lot better than the 45 degree skyline I had on Denman Island. |
| 02-Sep-2015 |
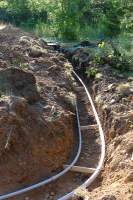
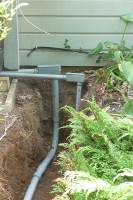
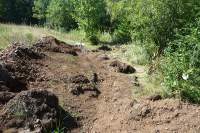
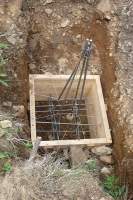
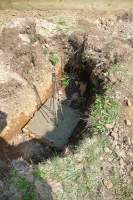
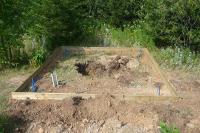
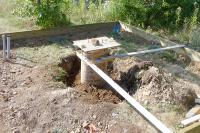
It has been a busy month. The machine-dug portion of the trench went fairly quickly, taking only a couple of evenings. But then, I had to complete the 50 feet or so of trench inside the fence by hand. That took several days' work. I laid the two conduits in the trench with wooden spacers. (pic #1) The larger conduit is for electricity, while the smaller is for network cables. The conduit is connected to the house, although the wires are not pulled yet. (pic #2) All the conduit had to be covered with sand before I could back-fill the removed earth and rocks. Since the only available site to dump a load of sand was 400 feet away, all of it had to be wheelbarrowed from the pile to the trench. I have completed back-filling at the house end and at the observatory end. (pic #3) There is a significant length in the middle that remains unfilled, but it will have to wait. My priority now is to get the observatory site prepared for moving the building. This week, I assembled the rebar cage fot the pier footing (pic #4) and poured the concrete for the footing. (pic #5) The next step will be the pier column, which will come up to 8" above grade level. I have laid out forms for the gravel bed that will form the foundation for the building. (pic #6) Once the pier excavation is back-filled, I will level the ground within the form and then fill it with packed gravel. The top of the square form will be the grade level.
|
| 29-Jul-2015 |
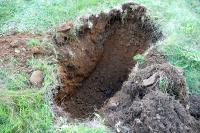
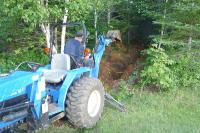
Finally, I have some progress to report on getting my observatory re-established. I have had a terrible time getting an excavation contractor lined up. Everyone is booked solid into the fall. Finally, I got a local guy who does backhoe work in his spare time to do it. He showed up this evening. He dug the hole for the footing for the pier, and got started on the electrical trench. He got about halfway done on that before knocking off for the night. The half he has done is the hard part, through the woods to the fence line. Now that he is out in the open, the rest of the trenching should be easier. The work is all on our property, but there is a privacy fence surrounding the house. There's no way to get equipment inside the fence, so I'll have to hand-dig that part. Not looking forward to that! The part he is digging is from the fence, through the woods, out to the clearing for the septic field. The trench will dog-leg around the edge of the drain field to the observatory site on the far side. The pier will have a concrete footing in a 16" sonotube. I think he hit bedrock at the bottom of the footing hole, so I will try to anchor the footing to that. Once the pier and trench have been back-filled, I will make a pad of compacted gravel for the base of the building. |
| 30-May-2015 |
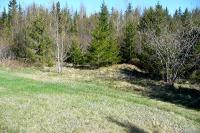
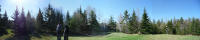
Of the three potential sites, I think I have chosen which one I like the best. Of course it is the most expensive option: I can't just have a crane pick the observatory up and set it in place. I'll have to get the building movers back to trundle it in over some rough ground, between trees and stuff. Oh, and it is the greatest distance from the house, just for additional expense with cable and conduit. Still, it has the best sky view on the property. The actual building site is shown in the first photo (looking west of north). It is the small clear area just in the treeline. I'll take down the 4 or 5 closest trees, to improve access and keep a reasonable skyline to the north. I can't build on the foreground area (where the camera is located) because it is the septic drain field. The second photo is a 4-frame, 180-degree+ panorama of the site's south view, showing the skyline from east through south to west. The sun is almost due east; the centre of the image is south. My utilities trench will have to dog-leg around the raised septic field. Total trenching distance from the corner of the house (behind the fence and trees at centre) to the site will be around 150 feet. The building will be moved onto the site through the opening at far left. The two guys are the building movers. Having seen the site, they figure the final move will be no problem. |
| 22-May-2015 |
Yesterday, the observatory made it to its destination at Hall's Harbour. Now I have to choose one of three potential sites, build a foundation, lay in electricity and network cables, and get the building dropped onto the foundation. It figures that the site with the best sky view has the most difficult access. But I found another site with a quite decent sky view and really convenient access, if I can talk my wife into going for it - it would make the observatory quite prominent in front of the house. That's all in the future. We now return to our regularly scheduled packing... |
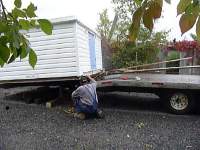
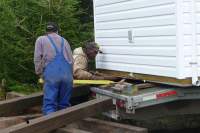
| 20-May-2015 |
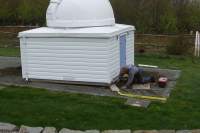
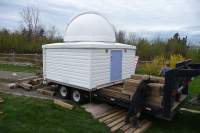
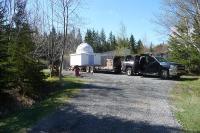
Well, the Hall's Harbour Observatory (H2O) is on its way from St. Bernard. The crew from Linden Mac showed up on time this morning and got right to work. They used air bags to do the lifting, the exact same type we use in the Fire Department for lifting and stabilizing crashed vehicles. I was really impressed with how professionally the crew worked. By 5:00 pm, the trailer with the building on board was heading down the driveway. They are driving part-way to Hall's Harbour tonight. Tomorrow morning, I will catch up to them and then supervise the unloading at the new place. The observatory will be parked in a clear area until I can prepare a foundation for it in its new permanent location. |
Copyright © 2019 by Kathleen Walker
Last modified: 04-Feb-2019